
AI Smart Search
AI Smart Search
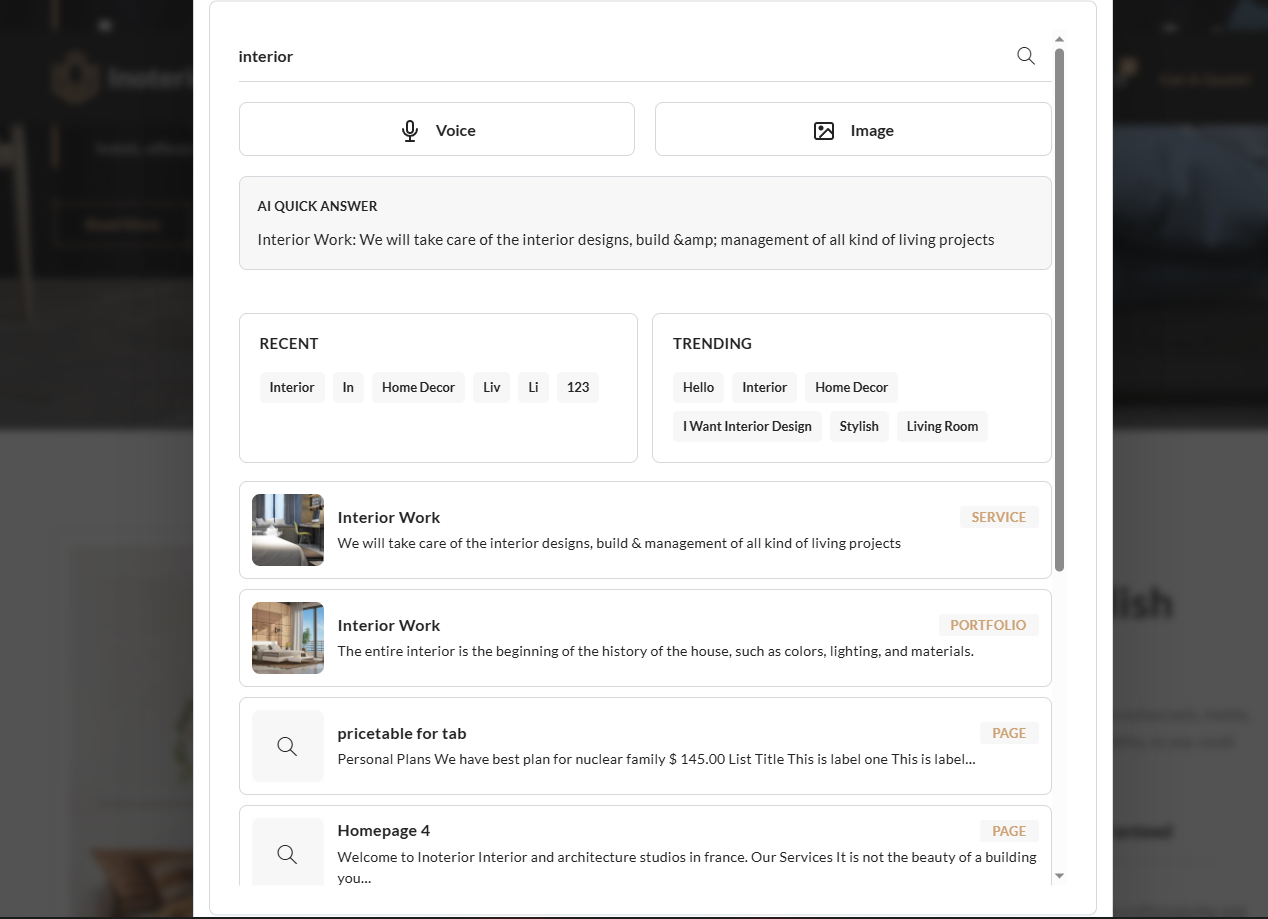
Inoterior theme includes a Smart Search AI system that helps visitors find content faster using smart search, optional AI features, live suggestions, voice input, visual search, and search analytics. All settings are managed from the Smart Search AI tab in Inoterior Options.
Overview
The Smart Search AI module adds an advanced search experience to your site. When Enable AI Smart Search is turned on, additional options become available for smart search, AI-powered results, quick answers, live suggestions, chatbot, voice search, visual search, trending searches, recent searches, and more. Most sub-features depend on Enable AI Smart Search being enabled first.
Benefits
- Helps visitors find posts, pages, and other searchable content more quickly
- Optional AI layer for smarter results, quick answers, and chatbot responses
- Live suggestions, trending searches, and recent searches improve discovery
- Supports WooCommerce integration, voice search, and visual (image) search
- Fully configurable from
Admin > Inoterior Options > Smart Search AIwithout editing code
How to Enable/Disable
- Go to Admin > Inoterior Options > Smart Search AI section.
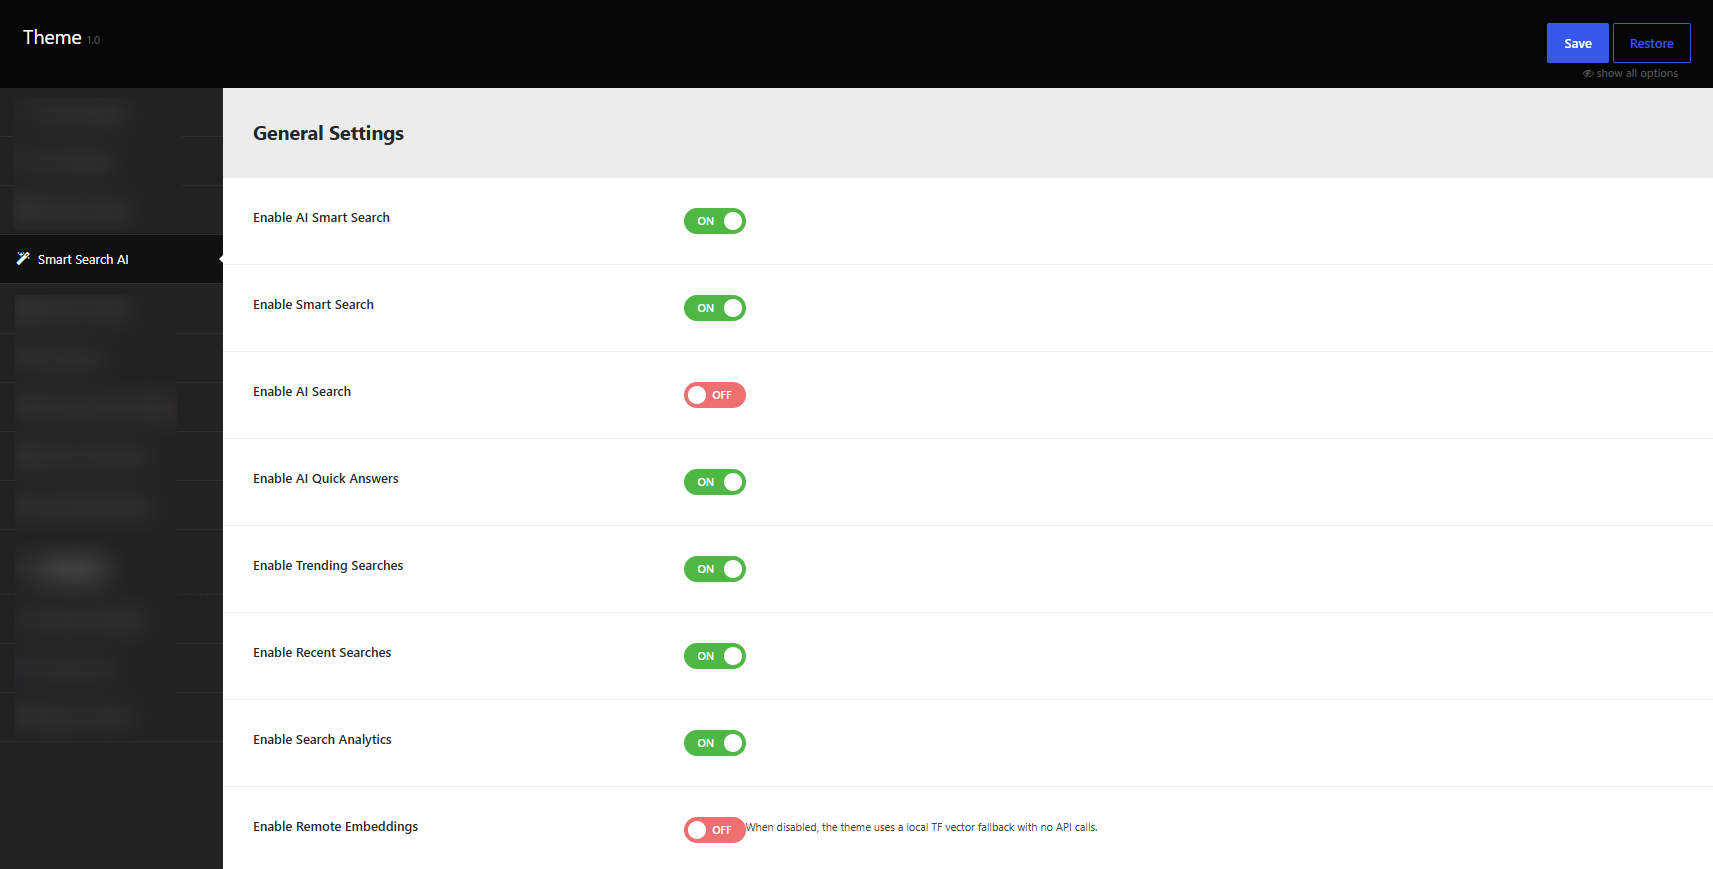
- Under General Settings, set Enable AI Smart Search to YES to activate the module, or NO to disable it entirely.
- When enabled, configure Enable Smart Search, Enable AI Search, and other sub-options as needed.
- Click Save Changes button to apply your settings.
Configuration Options
Under General Settings (available when Enable AI Smart Search is enabled):
- Enable AI Smart Search – Master switch for the Smart Search AI module (default: OFF)
- Enable Smart Search – Turns on the smart search experience (default: ON)
- Enable AI Search – Enables AI-powered search processing (default: OFF)
- Enable AI Quick Answers – Shows AI-generated quick answers in search results (default: ON)
- Enable Trending Searches – Shows trending search terms (default: ON)
- Enable Recent Searches – Shows the visitor's recent search terms (default: ON)
- Enable Search Analytics – Tracks search activity for analytics and trending data (default: ON)
- Enable Remote Embeddings – Uses remote embedding API calls; when disabled, the theme uses a local TF vector fallback with no API calls (default: OFF)
- Enable Background Processing – Processes indexing in the background (default: ON)
- Enable WooCommerce Integration – Includes WooCommerce products in smart search (default: ON)
- Enable Live Suggestions – Shows live autocomplete suggestions as visitors type (default: ON)
- Debug Mode – Enables debug output for troubleshooting (default: OFF)
How It Works
When Enable AI Smart Search is enabled, the theme loads the smart search interface using your selected Search Layout Style (Fullscreen Overlay or Header Dropdown). Search queries are processed against your configured post types. If Enable AI Search is on and an AI provider is configured, results can be enhanced with AI ranking and responses. Search results, suggestions, and cache behavior are controlled under Search Settings.
Usage Examples
- Enable Enable AI Smart Search and Enable Smart Search for a fast smart search panel without AI API costs.
- Enable Enable AI Search, choose a Provider (OpenAI, Groq, Gemini, etc.), and enter your API key to activate AI-enhanced search and quick answers.
Note: For detailed settings of each sub-feature, see the sections below or visit the Smart Search AI section on the Theme Options page.
AI Chatbot
Overview
The AI Chatbot provides a conversational assistant powered by your configured AI provider. When enabled, visitors can ask questions in natural language and receive responses based on your site content. The chatbot appears as a floating widget on the frontend.
Benefits
- Answers visitor questions in a conversational format
- Helps users who are unsure what to search for
- Works with your selected AI provider and chat/summary model
- Configurable position and conversation memory size
How to Enable/Disable
- Go to Admin > Inoterior Options > Smart Search AI section.
- Make sure Enable AI Smart Search is set to YES.
- Scroll to Chatbot Settings and set Enable AI Chatbot to YES or NO.
- Configure an AI Provider and API key under AI Provider Settings for the chatbot to generate responses.
- Click Save Changes button.
Configuration Options
Under Chatbot Settings (available when Enable AI Smart Search is enabled):
- Enable AI Chatbot – Turn the chatbot on or off (default: OFF)
- Chatbot Position – Bottom Right, Bottom Left, or Floating (default: Bottom Right)
- Conversation Memory Size – Number of previous messages the chatbot remembers (default: 5)
AI response behavior is also affected by settings under AI Provider Settings: Provider, Chat / Summary Model, Temperature (default: 0.2), Max Tokens (default: 90), and Request Timeout (default: 12).
How It Works
When enabled, the chatbot widget appears on the frontend at the configured position. The visitor types a question, and the theme sends the query to the configured AI provider using the selected chat model. The chatbot maintains conversation context based on the Conversation Memory Size setting, allowing follow-up questions within the same session.
Usage Examples
- Set Chatbot Position to Bottom Right and Conversation Memory Size to 5 for a standard floating assistant.
- Choose OpenAI as provider with GPT-4o Mini as the chat model for fast, cost-effective responses.
AI-Powered Quick Answers
Overview
AI-Powered Quick Answers displays concise, AI-generated responses directly in the search results. When enabled, the theme can surface a direct answer at the top of search results based on your site content and configured AI provider.
Benefits
- Provides instant answers without requiring visitors to open multiple pages
- Works alongside standard search results
- Uses your configured AI provider and chat/summary model
- Enabled by default when Smart Search AI is active
How to Enable/Disable
- Go to Admin > Inoterior Options > Smart Search AI > General Settings.
- Ensure Enable AI Smart Search is set to YES.
- Set Enable AI Quick Answers to YES or NO.
- For AI-generated answers, also enable Enable AI Search and configure an AI Provider with a valid API key.
- Click Save Changes button.
Configuration Options
- Enable AI Quick Answers – Turn quick answers on or off (default: ON)
- Enable AI Search – Required for AI-generated answer content (default: OFF)
- Provider – AI provider for generating answers: None, OpenAI, OpenRouter, Groq, Google Gemini, or Ollama Local
- Chat / Summary Model – Model selection varies by provider (e.g., GPT-4o Mini for OpenAI, Gemini 1.5 Flash for Gemini)
- Minimum Query Length – Minimum characters before a search is processed (default: 2) — under Search Settings
- AI-enabled Post Types – Post types included in AI processing — under Search Settings
How It Works
When a visitor submits a search query that meets the Minimum Query Length, the theme checks whether a quick answer can be generated. If Enable AI Search is on and a provider is configured, the AI layer generates a concise summary answer from content indexed in the selected AI-enabled Post Types. The answer appears alongside standard search results.
Usage Examples
- Enable Enable AI Quick Answers and Enable AI Search, set provider to OpenAI, and enter your OpenAI API key.
- Set Minimum Query Length to 2 so short queries like "hours" or "price" can trigger quick answers.
Instant Search Suggestions
Overview
Instant Search Suggestions (Live Suggestions) show autocomplete results as visitors type in the search field. Matching content from your configured post types appears in real time before the visitor submits a full search.
Benefits
- Speeds up the search process with real-time suggestions
- Reduces failed searches by guiding users to valid content
- Configurable debounce delay and post type filtering
- Enabled by default when Smart Search AI is active
How to Enable/Disable
- Go to Admin > Inoterior Options > Smart Search AI > General Settings.
- Ensure Enable AI Smart Search is set to YES.
- Set Enable Live Suggestions to YES or NO.
- Click Save Changes button.
Configuration Options
- Enable Live Suggestions – Turn live suggestions on or off (default: ON)
- Live Suggestion Post Types – Post types included in live suggestions (default: all available post types)
- Debounce Delay – Milliseconds to wait after typing before fetching suggestions (default: 300)
- Minimum Query Length – Minimum characters before suggestions appear (default: 2)
- Maximum Results – Maximum number of results returned (default: 8)
- Exclude Post Types – Post types excluded from live smart search
- Exclude Taxonomies – Posts assigned to selected public taxonomies are excluded from live smart search
How It Works
As the visitor types, the theme waits for the configured Debounce Delay (300ms by default), then sends a request if the query meets the Minimum Query Length. Matching items from Live Suggestion Post Types are returned, respecting any Exclude Post Types and Exclude Taxonomies rules. Results are limited by Maximum Results.
Usage Examples
- Check only Posts and Pages under Live Suggestion Post Types to keep suggestions focused on blog and page content.
- Increase Debounce Delay to 500 on high-traffic sites to reduce server requests while typing.
Voice Search
Overview
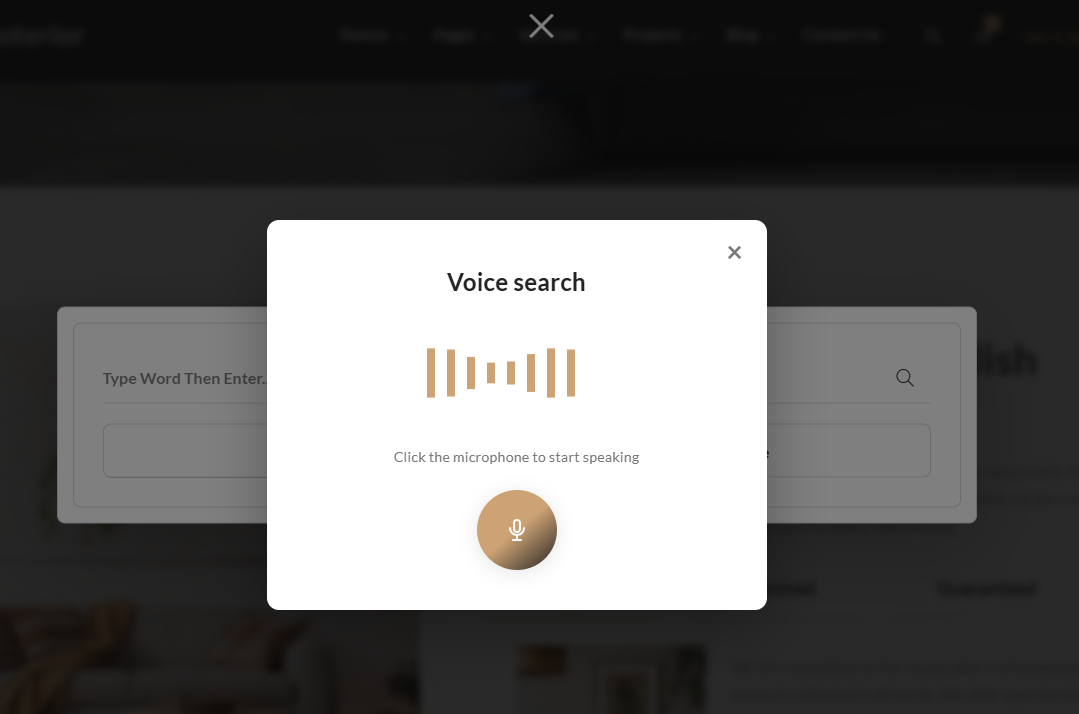
Voice Search allows visitors to speak their search queries instead of typing. When enabled, a voice input option is available in the search interface. Speech is converted to text using a configured voice provider.
Benefits
- Improves accessibility for users who prefer voice input
- Convenient on mobile devices where typing is slower
- Supports multiple voice providers including Groq Whisper, Google Speech-to-Text, Deepgram, and AssemblyAI
How to Enable/Disable
- Go to Admin > Inoterior Options > Smart Search AI > Voice Search Settings.
- Ensure Enable AI Smart Search is set to YES.
- Set Enable Voice Search to YES or NO.
- Select a Voice Provider and enter the corresponding API key.
- Click Save Changes button.
Configuration Options
Under Voice Search Settings:
- Enable Voice Search – Turn voice search on or off (default: OFF)
- Voice Provider – None, Groq Whisper, Google Speech-to-Text, Deepgram, or AssemblyAI (default: None)
- Groq API Key – Required when Voice Provider is Groq Whisper
- Google API Key – Required when Voice Provider is Google Speech-to-Text
- Deepgram API Key – Required when Voice Provider is Deepgram
- AssemblyAI API Key – Required when Voice Provider is AssemblyAI
How It Works
When the visitor activates voice search, audio is captured and sent to the configured Voice Provider for transcription. The returned text is used as the search query. A voice provider and valid API key must be configured — setting Voice Provider to None will not process voice input through an external service.
Usage Examples
- Set Voice Provider to Groq Whisper and enter your Groq API key for fast speech-to-text conversion.
- Set Voice Provider to Google Speech-to-Text and enter your Google API key for Google-powered transcription.
Visual Search (Image Search)
Overview
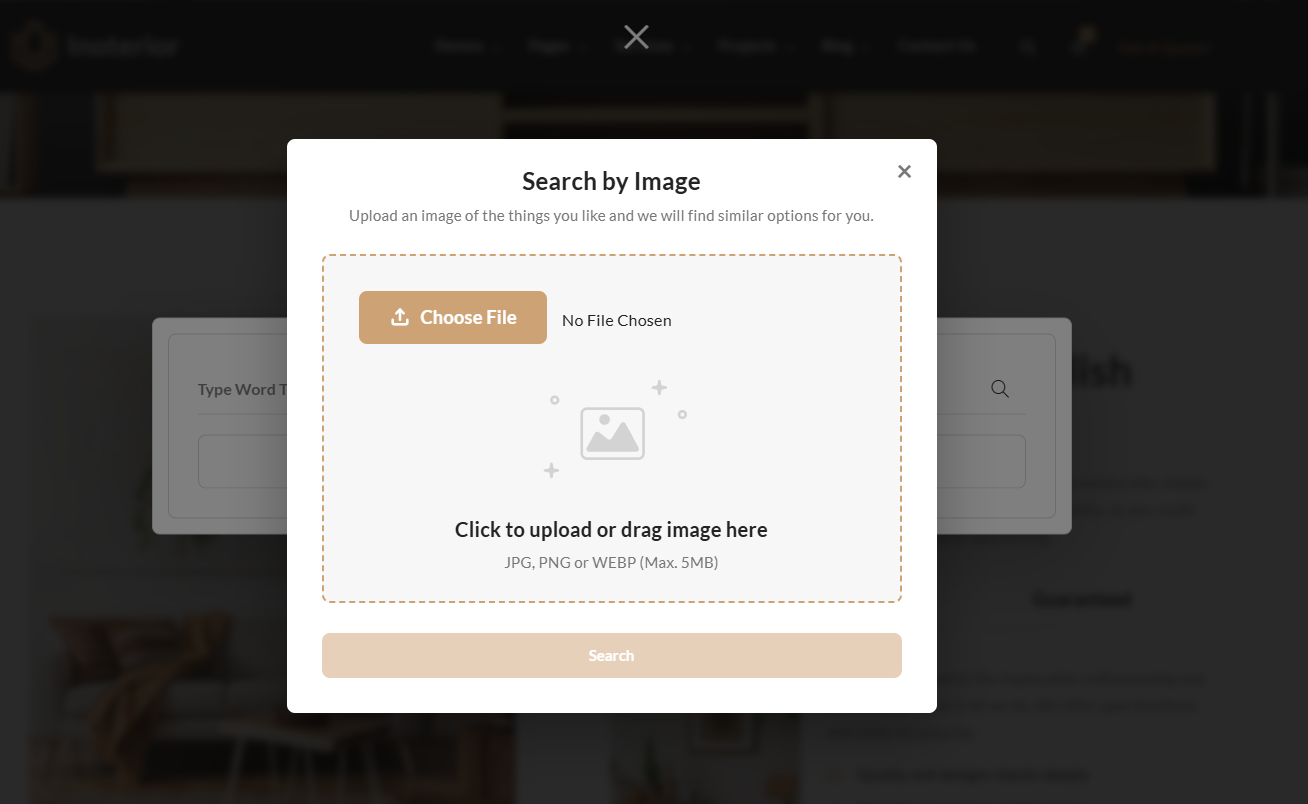
Visual Search (listed as Enable Visual Search in Theme Options) lets visitors search using an uploaded image. A vision AI provider analyzes the image and returns matching content from your site. This is useful for portfolio, gallery, and product-based websites.
Benefits
- Enables visual discovery — visitors can search by image, not just keywords
- Ideal for portfolio, gallery, and WooCommerce product sites
- Supports OpenAI Vision and Google Gemini Vision providers
How to Enable/Disable
- Go to Admin > Inoterior Options > Smart Search AI > Visual Search Settings.
- Ensure Enable AI Smart Search is set to YES.
- Set Enable Visual Search to YES or NO.
- Select a Vision Provider and enter your API Key.
- Click Save Changes button.
Configuration Options
Under Visual Search Settings:
- Enable Visual Search – Turn visual/image search on or off (default: OFF)
- Vision Provider – OpenAI Vision or Google Gemini Vision (default: OpenAI Vision)
- API Key – API key for the selected vision provider
How It Works
When enabled, the visitor can upload an image through the search interface. The image is sent to the configured Vision Provider for analysis. The provider returns descriptive data used to match against indexed site content. Results are displayed in the search panel based on visual similarity and relevance.
Usage Examples
- Set Vision Provider to OpenAI Vision and enter your OpenAI API key.
- Set Vision Provider to Google Gemini Vision and enter your Gemini API key.
Recent Searches
Overview
Recent Searches displays the visitor's previously searched terms inside the search panel. When enabled, past queries appear as clickable items so returning visitors can repeat searches without retyping.
Benefits
- Saves time for repeat visitors with one-click access to past queries
- Improves return visit engagement
- Enabled by default when Smart Search AI is active
How to Enable/Disable
- Go to Admin > Inoterior Options > Smart Search AI > General Settings.
- Ensure Enable AI Smart Search is set to YES.
- Set Enable Recent Searches to YES or NO.
- Click Save Changes button.
Configuration Options
- Enable Recent Searches – Show or hide recent search terms in the search panel (default: ON)
Note: For server-side search history with cross-device sync, see Search History Settings under Smart Search AI in Theme Options below.
How It Works
Each time a visitor performs a search, the query is stored and displayed in the recent searches area when the search panel is opened. Clicking a recent term re-runs that search immediately.
Usage Examples
- Leave Enable Recent Searches enabled (default) so visitors see their last searched terms when reopening the search panel.
- Disable Enable Recent Searches if you prefer not to show any search history in the panel.
Trending Search Keywords
Overview
Trending Search Keywords (listed as Enable Trending Searches in Theme Options) displays popular search terms in the search panel. Trending data is driven by search analytics when Enable Search Analytics is enabled.
Benefits
- Highlights popular search topics based on visitor activity
- Helps visitors discover content others are searching for
- Works together with Search Analytics for data collection
- Enabled by default when Smart Search AI is active
How to Enable/Disable
- Go to Admin > Inoterior Options > Smart Search AI > General Settings.
- Ensure Enable AI Smart Search is set to YES.
- Set Enable Trending Searches to YES or NO.
- Ensure Enable Search Analytics is set to YES to collect search data for trending terms.
- Click Save Changes button.
Configuration Options
- Enable Trending Searches – Show or hide trending search terms (default: ON)
- Enable Search Analytics – Collects search activity used to determine trending terms (default: ON)
How It Works
When Enable Search Analytics is on, the theme tracks search queries from visitors. Frequently searched terms are surfaced in the trending searches area when the search panel opens. Clicking a trending term runs a search for that query immediately.
Usage Examples
- Enable both Enable Trending Searches and Enable Search Analytics to automatically show popular searches as your site accumulates search data.
- Disable Enable Trending Searches if you do not want to display popular search terms in the search panel.
Smart Search AI in Theme Options
Overview
All Smart Search AI features are controlled from the Smart Search AI tab inside Inoterior Options. This tab is organized into multiple setting groups. Most options require Enable AI Smart Search to be enabled first.
Benefits
- Single location to manage every smart search and AI feature
- Granular control — enable only the features your site needs
- Consistent with other Inoterior Theme Options sections
- Settings can be exported/imported via Theme Options Import/Export
How to Access
- Go to Admin > Inoterior Options in your WordPress dashboard.
- Click on the Smart Search AI tab in the left sidebar.
- Configure each option group and click Save Changes.
Configuration Options
The Smart Search AI tab contains the following setting groups:
General Settings
- Enable AI Smart Search (default: OFF)
- Enable Smart Search (default: ON)
- Enable AI Search (default: OFF)
- Enable AI Quick Answers (default: ON)
- Enable Trending Searches (default: ON)
- Enable Recent Searches (default: ON)
- Enable Search Analytics (default: ON)
- Enable Remote Embeddings (default: OFF) — When disabled, uses local TF vector fallback with no API calls
- Enable Background Processing (default: ON)
- Enable WooCommerce Integration (default: ON)
- Enable Live Suggestions (default: ON)
- Debug Mode (default: OFF)
AI Provider Settings
- Provider — None, OpenAI, OpenRouter, Groq, Google Gemini, Ollama Local (default: None)
- Chat / Summary Model — Model options vary by provider:
- OpenAI: GPT-4o Mini (default), GPT-4.1 Mini
- OpenRouter: DeepSeek Chat (default), DeepSeek R1, Llama 3.1 70B Instruct, Mistral 7B Instruct, Mixtral 8x7B Instruct, Claude 3.5 Sonnet, Qwen 2.5 72B Instruct
- Groq: Llama 3 70B (default), Llama 3.1 70B Versatile, Mixtral 8x7B, Gemma 2 9B
- Google Gemini: Gemini 1.5 Flash (default), Gemini Pro
- Ollama Local: Llama 3 (default), Mistral, Gemma
- Embedding Model — text-embedding-3-small (default), text-embedding-3-large (OpenAI only)
- OpenAI API Key, OpenRouter API Key, Groq API Key, Gemini API Key — Provider-specific API keys
- Ollama Endpoint (default: http://127.0.0.1:11434)
- Temperature (default: 0.2)
- Max Tokens (default: 90)
- Request Timeout (default: 12)
Search Settings
- Searchable Post Types — Post types included in search (default: all available)
- AI-enabled Post Types — Post types processed by AI (default: all available)
- Live Suggestion Post Types — Post types shown in live suggestions (default: all available)
- Exclude Post Types — Post types excluded from search
- Exclude Taxonomies — Posts in selected taxonomies excluded from live smart search
- Cache Duration (default: 3600 seconds / 1 hour)
- Minimum Query Length (default: 2)
- Maximum Results (default: 8)
- Debounce Delay (default: 300)
- Search Layout Style — Fullscreen Overlay (default) or Header Dropdown
- Indexer Batch Size (default: 10)
Chatbot Settings
- Enable AI Chatbot (default: OFF)
- Chatbot Position — Bottom Right (default), Bottom Left, Floating
- Conversation Memory Size (default: 5)
Voice Search Settings
- Enable Voice Search (default: OFF)
- Voice Provider — None (default), Groq Whisper, Google Speech-to-Text, Deepgram, AssemblyAI
- Provider API keys: Groq API Key, Google API Key, Deepgram API Key, AssemblyAI API Key
Visual Search Settings
- Enable Visual Search (default: OFF)
- Vision Provider — OpenAI Vision (default), Google Gemini Vision
- API Key
Recommendations Settings
- Enable Recommendations (default: OFF)
- Tracking Mode — Views Only (default), Views & Clicks, All Interactions
Search History Settings
- Enable Search History (default: OFF)
- Sync Across Devices (default: ON)
- History Retention (Days) (default: 90)
Vector Database Settings
- Vector Storage Provider — Local Storage (default), Pinecone
- Pinecone API Endpoint — Required when provider is Pinecone
- Pinecone API Key — Required when provider is Pinecone
How It Works
Settings saved in the Smart Search AI tab are stored in the WordPress options table. The theme reads these values on each page load to conditionally render search UI, enqueue scripts, configure AI providers, and manage indexing. When Enable Background Processing is on, content indexing runs in the background using the configured Indexer Batch Size. Vector data is stored locally by default, or in Pinecone when configured.
Note: You can backup your Smart Search AI settings using the Import / Export tab in Theme Options. See Theme Options page for details.